If at first you don’t succeed …
Okay, so a new post is now long overdue. Things have been busy recently what with the summer holidays still a fresh (but fading fast) memory and all sorts of other things demanding my time.
Additionally, I was waiting to get a project to a specific stage before posting about it and this, unfortunately, has taken longer than expected. Regardless, I got there in the end and hence, this is said post.
I finally handed over the finished brass plaques (see Bullet casings …) to the rifle club a couple of week’s ago and they were very well received, much to my relief. As it happens, the little buggers took me on a bit of journey before arriving where I wanted to be however much knowledge was gained along the way.
Preparation
I had been given the required dimensions of the plaques by the rifle club and they needed to be 50mm x 30mm. As is often my way, I started to think of ways to embellish the design and after mulling it over for some time I settled on a simple border. And so after a quick visit to my local art and craft shop, I had the necessary materials to produce the patterns.


I spray painted the finished patterns to produce a smooth finish. In retrospect, the unpainted plastic was probably smoother because the paint created a very subtle, mottled finish on the surface.
Casting
With the patterns produced, my mind turned to the casting process. I visualised a central pouring sprue with the gates into the patterns arranged radially around the sprue.


Seemed logical to me so with that in mind, I attempted my first cast … note the use of the word, “first”.
It’s probably worth mentioning at this stage that because I was melting down brass – bullet casings in this instance – I needed to wear breathing apparatus to protect myself from the zinc oxide fumes. Since the melting point of zinc is much lower than that of copper, some of the zinc evaporates off. The zinc oxide can been seen as a white “smoke” which tends to leave a yellow-white residue on stuff that it comes into contact with. If you end up with it in your lungs it can cause zinc poisoning, or “zinc flu” because it produces flu-like symptoms. I have a 3M face mask with fume/vapour filter cartridges which does the job of protecting my lungs very nicely.
Anyway, here is the pour …
Followed by the big reveal …
As you can see, the turn-out was less than adequate!
Not wanting to be defeated, I figured that the reason for the failure may have been down to the molten bronze not being at an optimal temperature. I decided to have a second attempt but this time making absolutely sure the metal was at a suitable pouring temperature.
And here was the result …

Doh! If anything, the second attempt was worse! 🙁
Definition of a fool …
A small aside. Clearly, there was something I was doing incorrectly that was causing a problem. I have read elsewhere that the definition of a fool is someone who does the same thing over and over again but expects a different result each time. I didn’t want to be the fool … the bronze was not going to get the better of me!
Back to the drawing board
It was at this stage that I decided to consult with the chaps at The Home Foundry. This forum is the home of a fantastic community who are super knowledgeable and super helpful. It transpired that perhaps I wasn’t venting the moulds adequately and trapped air was preventing the metal from flowing fully into the cavities. Users on the forum suggested an alternative casting method which made sense in light of this realisation and so I decided to try it out.
The new method involved a vertical or “bronzer” flask into which molten bronze is poured through a hole in the top. The proposed arrangement of the patterns were to be like the branches of a tree connected to a central pouring sprue.
I think the following photos demonstrate the idea …


The above photos show the arrangement of the patterns around the central pouring sprue. I angled the pieces in such a way as to allow air to escape as the metal flowed in and used a piece of 15mm copper pipe to form the pouring sprue.

For this cast I used approximately 1Kg of raw material.
And the final result …
Yay! A much better result this time. Happy me! 🙂
Whilst it looks like one of the patterns didn’t fill in the above video, this was not the case. All of the moulds were successfully filled but one of them simply had casting sand stuck to it when I opened up the flask.


The journey was not over yet …
I was very pleased with the turn-out of these plaques so I trimmed them off the sprue and began the task of clean-up. Bearing in mind that the face would need to be hand polished to a high sheen ready for engraving, I had failed to identify a problem at the design stage which very quickly became apparent now however. By adding the border, it made it virtually impossible for me to clean and polish right into the corners.

I spoke to Owen at the rifle club and he was happy for me to drop the borders so I quickly produced some new patterns and cast another batch of borderless plaques.

It’s not easy to see in the above photo but the edges had been lightly sanded to create a draft. The draft is a slight angle on the edges that facilitates a clean pull from the sand.


The above is the obligatory pour video. Most foundries big and small like these. 🙂
So the final result wasn’t without its flaws on this occasion.

As you can see, a couple of the moulds failed to pour correctly. I’m not sure why those two failed when all the others were fine.

My only other concern was that the surface of these plaques was particularly rough. Again, I’m not sure why this was the case.
Regardless, I had some plaques to work with. I had enough to produce six finished pieces and set to work on the clean up.
The clean up
Simply put, this involved lots and lots of filing and sanding. Lots. And ultimately polishing to finish off. I have a couple of grades of file, with the most course being used to take material off quickly. The following picture illustrates the finish after the filing stage.

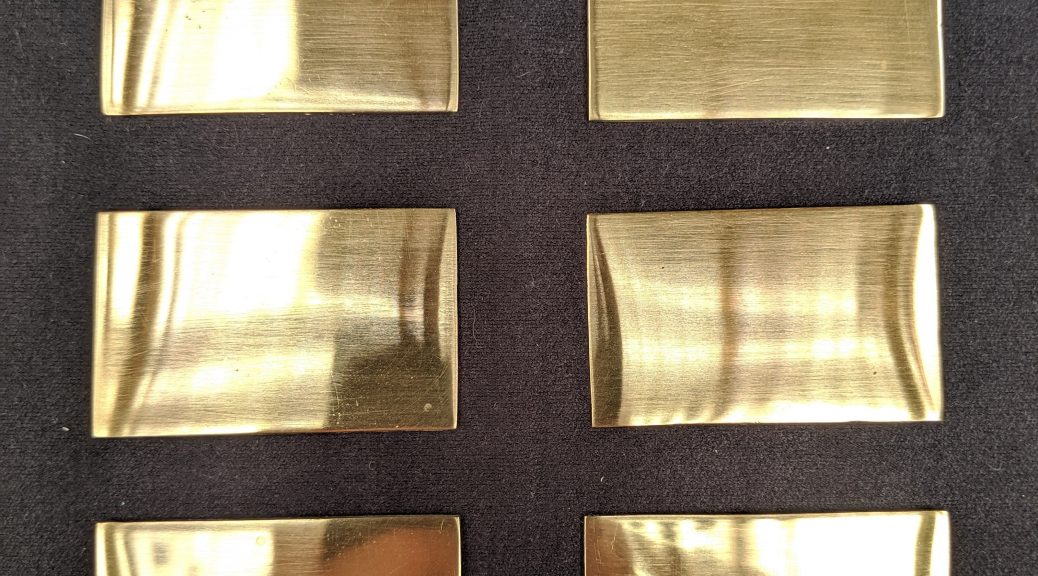
After I had completed the filing, I used various grades of silicon carbide abrasive paper to remove the scratches. The grades started at about 200 (course) and went up to 3000 (finest), after which the plaques were finished with wire-wool and Autosol metal polish.

Eventually, I had the plaques polished to a level I was happy with and I handed them to Owen at the gun club. Once they have been inscribed and set into the gun stocks, I will endeavour to post some more pictures.

Final thoughts
For what was a relatively simple end-product, these plaques represent quite a journey. I learnt a lot, from discovering the impact that a design decision might have on the production further down the line to furthering my understanding of gating, venting, and creation of the sand mould. This is all good stuff as the “failures” only serve to improve my knowledge and skill.
It will be a real pleasure to see them in their final location … watch this space! 🙂
One Reply to “If at first you don’t succeed …”
Glad you got there in the end. Rarely do things work perfectly first time…. but some great learnings along the way. And a super finish. Thanks for sharing.